Canada
Piping identification is the standardized practice of labeling pipes to show contents, flow direction, and hazards across U.S. facilities. It reduces errors, speeds maintenance, and supports compliance with ANSI/ASME and NFPA guidance. VisionMarker supports piping identification programs nationwide with durable, ANSI‑certified markers built for harsh environments.
By Dante de Felice • Last updated: 2026-06-15
Overview: Piping Identification in 2026
Modern pipe ID programs combine clear text, color bands, and directional arrows so anyone on the floor can recognize what flows where in seconds. The goal is simple: prevent mix-ups, speed isolation, and meet recognized standards with materials that withstand UV, moisture, and chemicals in demanding U.S. facilities.
Facility managers and EHS leaders need pipe markers that stay readable year-round and align to current conventions. This overview shows you what piping identification is, why it matters, and how to build a compliant, durable system with VisionMarker’s materials and methods.
- What you’ll learn: definitions, standards, materials, placement rules, and maintenance
- Who it’s for: facility managers, maintenance supervisors, and EHS professionals
- What you’ll walk away with: a practical framework, checklists, and a rollout plan
Local considerations for your area
- Account for regional climate swings in the USA (freeze–thaw, heat waves). Choose UV- and moisture-resistant markers and schedule seasonal inspections after temperature extremes.
- Coordinate with shift schedules in 24/7 operations. Plan audits during low-traffic windows to reduce lockout and isolation downtime.
- Align with your corporate OSHA/ANSI playbooks. Standardize color and wording so visiting contractors see the same conventions across sites.
Quick navigation
- What is piping identification?
- Why it matters
- How it works
- Types and approaches
- Standards and compliance
- Best practices
- Tools and resources
- Case studies and examples
- Procurement & value considerations
- Maintenance & program management
- FAQ
- Conclusion & next steps
What Is Piping Identification?
Piping identification is the system of marking pipes with text, color fields, and arrows to show contents and flow. It enables quick recognition, safe isolation, and consistent communication across facilities, supporting maintenance efficiency, emergency response, and alignment with widely recognized safety conventions.
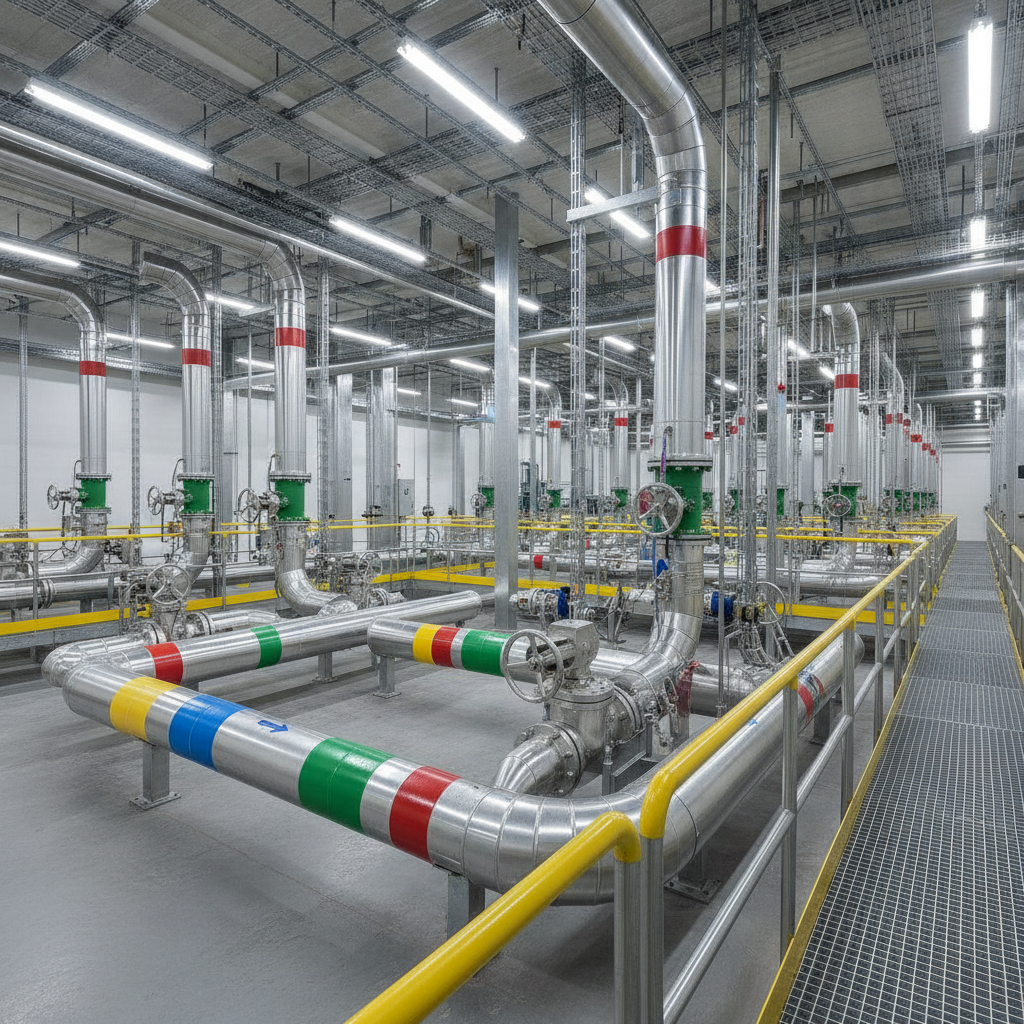
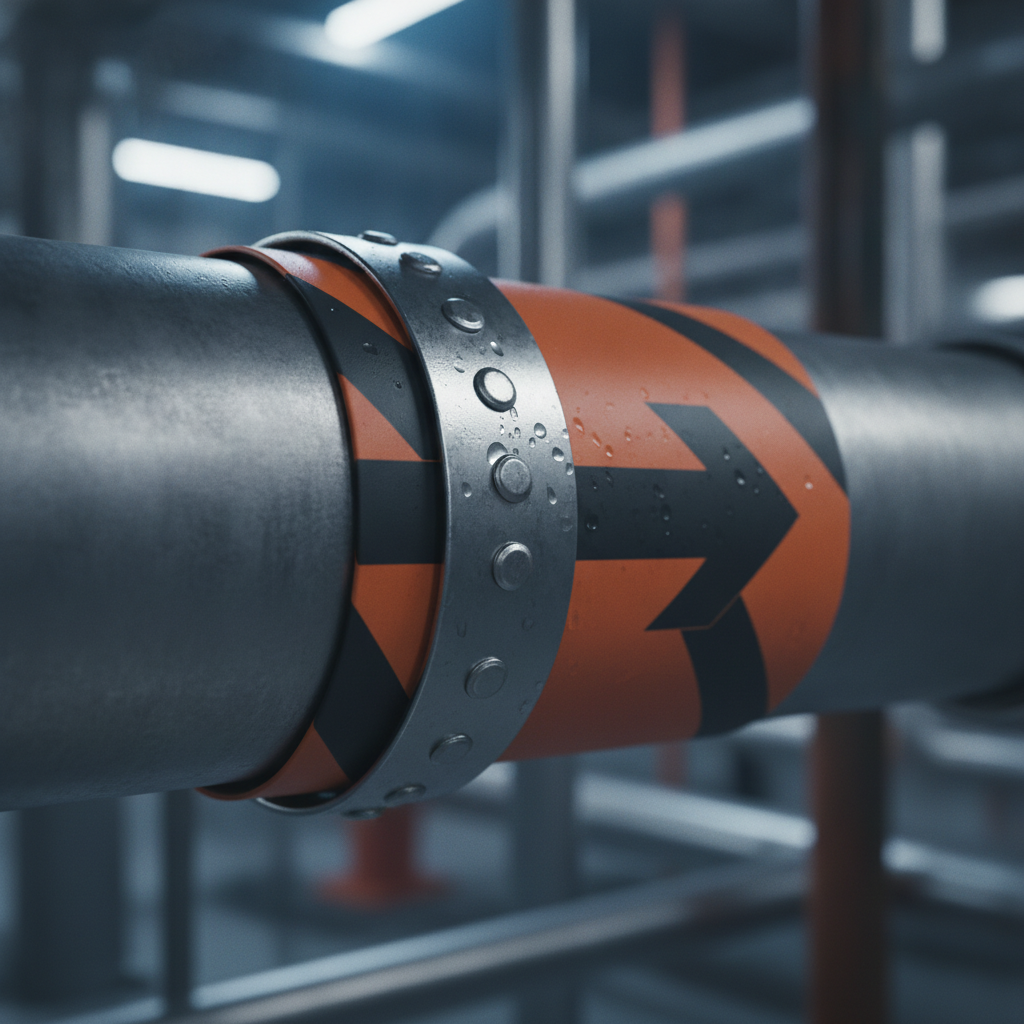
At its core, piping identification translates complex mechanical systems into fast visual cues. Markers typically include three elements: the pipe’s contents name, a directional arrow indicating flow, and a color band that classifies the media type (for example, water, air, or hazardous fluids). When these cues are consistent, anyone—new hires, contractors, inspectors—can navigate unfamiliar systems quickly.
VisionMarker focuses on durable markers that maintain legibility in real-world conditions. Our customers in industrial plants, utilities, and warehouses adopt pipe ID to reduce isolation time during maintenance, lower the risk of cross-connection, and standardize training across multiple U.S. sites.
- Plain-language text eliminates guesswork for operators and responders.
- Arrows reduce tracing time when lines weave through racks and ceilings.
- Color bands group hazards and media types into easily scanned categories.
Because the same conventions appear on every pipe, teams can rely on visual recognition under stress. That’s the everyday value of an effective pipe ID program.
Why Piping Identification Matters
Clear pipe ID prevents mix-ups, speeds lockout/tagout, and supports emergency response. It also improves training and inspection efficiency across multi-site operations. In fast-moving environments, consistent visuals reduce search time and help teams make the right isolation decisions the first time.
Consider how many people interact with piping each week—operators, maintenance techs, contractors, auditors. Each person benefits when pipes are labeled clearly and consistently. Missed or misread markers can lead to incorrect valve closures, product quality issues, or, in the worst cases, injuries during emergency isolation.
In our experience working with national facility teams, three drivers dominate:
- Operational speed: Technicians locate lines faster when arrows and contents are visible from normal approach angles.
- Risk reduction: Clear classification helps personnel apply the right PPE and procedures around hazardous or high-energy lines.
- Program consistency: Standard wording and colors enable mobile contractors to work confidently across different plants.
When you combine these factors, unplanned downtime drops and first-time-right maintenance improves. That’s why safety leaders build pipe ID into their core visual workplace strategy.
How Piping Identification Works
An effective pipe ID program follows a repeatable cycle: survey the system, standardize wording and colors, apply durable markers at key viewing points, verify visibility, and maintain through scheduled audits. This closed loop keeps labels readable and aligned with evolving processes.
Successful programs don’t start at the printer—they start on the floor. Survey your systems, document contents and flow, and define naming conventions before ordering markers. Then apply markers where people naturally look: at valves, junctions, wall penetrations, and regular approach paths.
Core steps
- Survey: Walk each line end-to-end, mapping contents and flow direction. Note approach angles and obstructions.
- Standardize: Approve contents names, color assignments, and arrow conventions to ensure cross-site consistency.
- Select materials: Choose self-adhesive, strap-on, or snap-wrap markers that match pipe conditions and accessibility.
- Apply: Clean surfaces, align arrows with flow, and place at intervals that maintain visibility along all walkways.
- Verify: Field-check legibility from normal working distances and common approach angles.
- Maintain: Schedule inspections, refresh faded or damaged labels, and update when processes change.
Typical placement logic
- Install at valves, tees, and crossings where decisions happen.
- Repeat markers on long runs so one is always visible from normal approach points.
- Place before and after wall or floor penetrations so direction stays clear.
- Mount arrows so they’re unmistakably aligned with actual flow.
| Process phase | Objective | Typical actions |
|---|---|---|
| Survey | Understand reality | Trace lines, confirm media, note approach angles and lighting |
| Standardize | Ensure consistency | Approve names, colors, and arrow usage across sites |
| Apply | Make it visible | Clean, place markers at decisions points and intervals |
| Verify | Test usability | Check read distance, glare, and shadow zones |
| Maintain | Keep it accurate | Audit on schedule; replace, add, or relocate as needed |
Need a starting point? VisionMarker’s piping identification page outlines common media categories and marker formats used across U.S. facilities.
Types/Methods/Approaches
Pipe markers come in self-adhesive, snap-wrap, and strap-on formats, with laminates engineered for UV, moisture, and chemical resistance. Choose the attachment and material that matches pipe accessibility, surface condition, and exposure to sunlight, washdowns, and heat.
You don’t need one solution for every line. In fact, a mixed toolkit usually performs best. Use self-adhesive on clean, accessible runs; snap-wraps on insulated or rough surfaces; and strap-on carriers for oversized or high-temperature pipes where adhesives are unreliable.
Marker formats
- Self-adhesive markers: Fast to install on clean, painted metal or plastic. Ideal for accessible runs and routine refreshes.
- Snap-wrap markers: Wrap-around sleeves for insulated or rough-surface lines; removable for maintenance.
- Strap-on carriers: Rigid or semi-rigid carriers fixed with stainless ties on large diameter or hot lines.
Material considerations
- Outdoor exposure: Prioritize UV-resistant laminates and inks for rooftop and yard piping.
- Washdown/chemicals: Use chemical-resistant face films for food, beverage, and process areas with regular cleaning.
- High heat: Select substrates rated for expected surface temperatures near boilers, steam, or ovens.
Comparison at a glance
| Marker type | Material | Best use | Attachment |
|---|---|---|---|
| Self-adhesive | Vinyl + laminate | Clean, accessible runs | Pressure-sensitive adhesive |
| Snap-wrap | Flexible sleeve | Insulated/rough surfaces | Wrap, friction fit |
| Strap-on | Rigid carrier | Large diameter, hot lines | Stainless steel ties |
Explore VisionMarker’s range of pipe markers, including popular lines such as water and air, selected for clarity and durability in busy facilities.
Standards and Compliance
Use a standards-driven approach. Align color fields, text, and symbols with widely recognized conventions, and document your choices in a site standard. Consistency across locations is more important than brand-specific details—make it obvious, legible, and durable for the real world.
Safety signage and identification live within a broader ecosystem of North American conventions and best practices. While each company’s internal standard may differ in specifics, the core idea stays consistent: unambiguous visuals that hold up under stress and weather.
- Color fields and signal words should follow a clear, documented logic your teams recognize instantly.
- Symbols for fire protection and emergency equipment must be visible and consistent with your overall signage program.
- Documentation keeps contractors and future team members aligned when systems change.
For context on how industries codify technical visuals and safety programs, see this general industrial safety guide and this overview of standardized material specifications. Broader safety culture practices—like training cadence and visual consistency—are also discussed in this safety improvement article.
VisionMarker’s catalog emphasizes ANSI-certified quality and multi-standard alignment across categories, helping U.S. facilities keep visual communication consistent from piping to fire safety signs.
Best Practices
Keep text plain, arrows accurate, and markers placed where people decide—at valves, junctions, and penetrations. Standardize wording and colors across sites, and select materials that match exposure to sunlight, washdowns, heat, and abrasion. Audit routinely and refresh before legibility fades.
Design best practices
- Use plain language: Spell contents exactly as operators say them. Avoid jargon that slows recognition.
- Maximize contrast: Pair ink colors and backgrounds for fast legibility in variable lighting.
- Right-size the label: Ensure text height and color bands are readable from normal working distances.
Placement best practices
- Orient to flow: Verify arrow direction during installation and after maintenance.
- Repeat on long runs: Place at intervals so one marker is always visible from typical approach points.
- Cover decision points: Add markers before/after walls, at tees, and near valves and gauges.
Program best practices
- Document your standard: Lock in wording, colors, and placement rules as a controlled document.
- Train and verify: Walk techs through the logic; confirm they can find and follow lines in real lighting.
- Audit on schedule: Assign owners for quarterly walkdowns and post-maintenance checks.
When in doubt, test on the floor. A short pilot in a busy corridor will reveal whether your markers work in everyday glare, dust, and motion.
Tools/Resources
Build your toolkit around durable markers, surface prep supplies, and a simple survey-and-audit checklist. Pair products with procedures: survey sheets, standard wording lists, and a recurring audit cadence keep your visuals accurate and trusted across shifts.
- Markers and carriers: Self-adhesive, snap-wrap, and strap-on options for varied surfaces and temperatures.
- Surface prep: Degreasers and wipes for reliable adhesion on painted or metallic pipes.
- Templates: Contents naming list, color assignment sheet, and placement checklist.
- Audit log: Track inspections, replacements, and system changes.
Explore VisionMarker’s catalog of pipe markers and complementary fire safety products to integrate piping ID with broader emergency wayfinding and equipment identification across your facility.
Case Studies/Examples
Real-world rollouts show the value: faster line tracing, fewer isolation errors, and simpler contractor onboarding. Mixed marker formats—adhesive, snap-wrap, and strap-on—help sites cover everything from small utility lines to large insulated mains without sacrificing readability.
We’ve supported multi-site teams across the USA. Three representative scenarios illustrate how a practical, standards-driven approach delivers results:
1) Distribution center utility corridor
- Challenge: Overhead piping crossed forklift aisles with poor visibility at intersections.
- Approach: Strap-on carriers on large mains, self-adhesive markers on branch lines, arrows oriented at every crossing.
- Outcome: Operators traced air and water lines faster during shutdowns, and contractors reported easier onboarding.
2) Food processing washdown zone
- Challenge: Routine chemical washdowns degraded older markers and dulled colors.
- Approach: Chemical-resistant laminates and repeated placements at equipment interfaces, plus a quarterly audit schedule.
- Outcome: Markers stayed legible between cleanings, reducing rework during maintenance windows.
3) Campus boiler plant
- Challenge: Heat and condensation near steam lines compromised adhesive-only labels.
- Approach: Strap-on carriers on hot surfaces and snap-wraps on insulated lines; added markers before/after wall penetrations.
- Outcome: Improved readability around valves and gauges, with fewer post-maintenance misorientations.

For media-specific needs, see our focused options such as water, air, and non‑potable water identifiers used in many utility rooms and process areas.
Procurement & Value Considerations
Think in terms of total program value, not individual stickers. Durable materials, consistent wording, and scheduled audits reduce downtime and rework. Quote-based orders let you standardize across sites and align quantities, media categories, and installation timelines.
VisionMarker supports a quote-based approach many corporate teams prefer for standardization. This keeps wording, color assignments, and material specs consistent whether you’re outfitting a single plant or coordinating a multi-site rollout in the USA.
- Bundle by media: Group common contents—water, air, natural gas, process lines—so reorders are simple.
- Specify exposures: Call out UV, washdown, and temperature conditions so materials match reality.
- Plan installation: Sequence by area (mechanical rooms, corridors, rooftops) to minimize operational disruptions.
For program owners, the payoff is consistency and fewer surprises during audits and shutdowns.
Maintenance & Program Management
Treat pipe ID as a living system. Assign ownership, set an audit cadence, and update markers when equipment or routing changes. A simple log—what changed, where, and when—keeps visuals accurate across shifts and contractor turnovers.
- Ownership: Name a visual management owner in operations or EHS.
- Cadence: Align audits with seasonal maintenance or shutdowns.
- Change control: Add ID updates to your Management of Change checklist.
- Spare stock: Keep a small kit of common markers for quick replacements.
Many teams use a simple walkdown sheet with locations, contents, condition, and next action. Tie this to your work order system so refreshes don’t get lost. For reference categories and common messages, browse our self‑adhesive pipe markers guide.
Frequently Asked Questions
These concise answers address the questions facility teams ask most about pipe ID—what to mark, where to place, and how to keep markers readable in harsh U.S. conditions.
What pipes need identification?
Identify pipes that carry contents which could affect safety, operations, or quality—utilities, process media, and anything that requires isolation during maintenance or emergencies. Prioritize lines people interact with regularly or must trace quickly.
Where should I place pipe markers?
Place markers at valves, tees, and crossings; before and after wall or floor penetrations; and at intervals along long runs so one is always visible from typical approach angles. Orient arrows with actual flow.
Which material should I choose for harsh areas?
Use chemical-resistant laminates in washdown zones, UV-resistant films outdoors, and strap-on carriers for hot or large-diameter lines. Match the marker format to exposure, temperature, and surface condition.
How often should I audit my pipe ID program?
Set an audit cadence that aligns with your maintenance cycles—often quarterly for busy areas and at least annually for stable utility spaces. Always review after equipment changes or shutdown projects.
Can I standardize wording across multiple sites?
Yes. Create a controlled list of approved contents names and color assignments. Use it as a shared standard so contractors and technicians see the same conventions across all locations.
Conclusion & Next Steps
A resilient piping identification program is simple, standardized, and maintained. Document the logic, choose materials for real exposures, label where decisions happen, and keep it current. The result is faster work, fewer errors, and stronger safety culture across your U.S. facilities.
- Key takeaways
- Make markers obvious where people make decisions.
- Standardize wording and colors across sites.
- Match materials to UV, chemicals, heat, and abrasion.
- Audit routinely and refresh proactively.
- Action steps
- Survey one critical area this week and draft your wording list.
- Pick formats by exposure: adhesive, snap-wrap, or strap-on.
- Create a recurring audit task in your work order system.
- Explore VisionMarker’s piping identification resources and product options.
Need a quick start? Standardize your next rollout with durable, ANSI‑focused pipe markers and a simple audit kit. See formats and media categories on our pipe markers page.