Canada
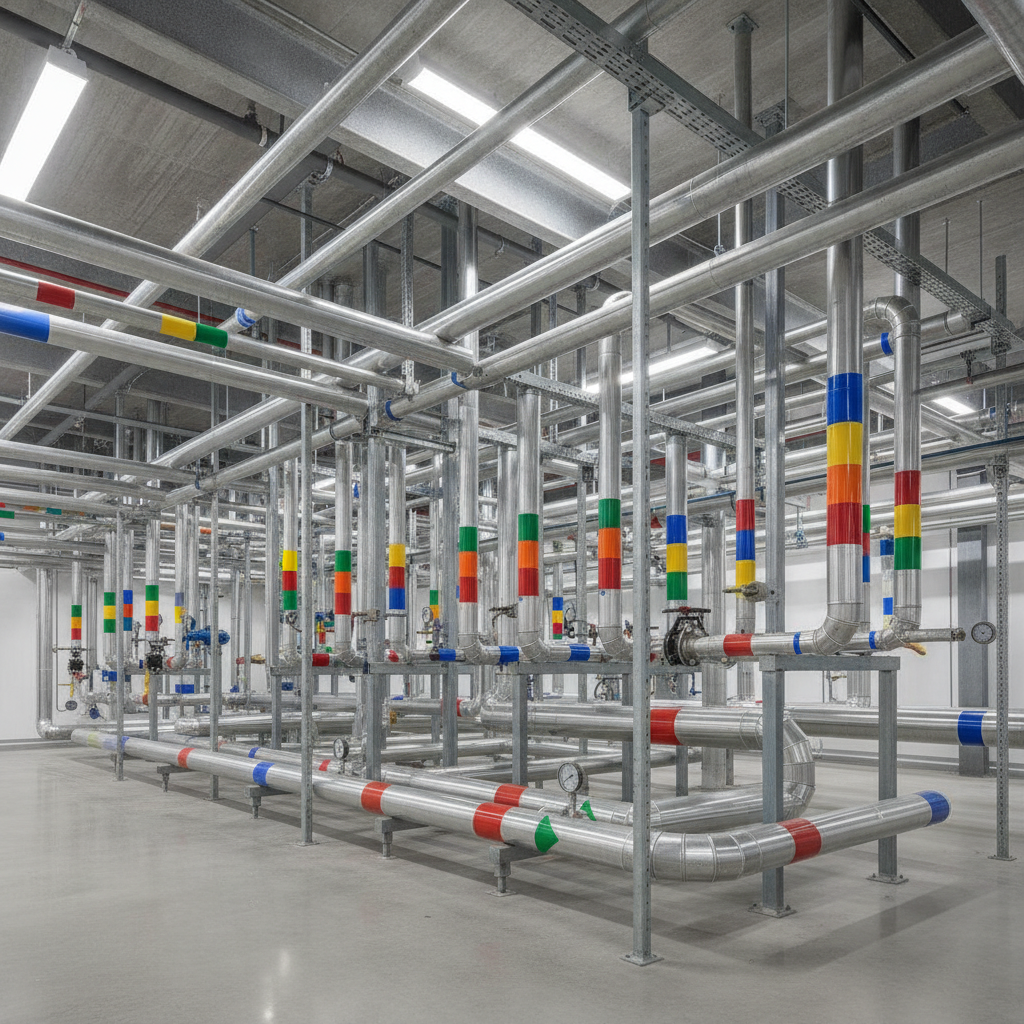
Self-adhesive pipe markers are durable, wrap-around labels that identify pipe contents and flow direction on contact. In U.S. facilities, they support clear communication, faster maintenance, and safer operations. VisionMarker serves industrial teams across the USA with ANSI-aligned options designed to resist UV, moisture, and chemicals.
By Dante de Felice · Last updated: 2026-06-14
Overview: Self-Adhesive Pipe Markers in 2026
Use self-adhesive pipe markers to label contents, show flow direction, and improve compliance across your facility. In 2026, the best practice is simple: choose ANSI/ASME-aligned colors and legends, prep surfaces, apply wrap-around markers at consistent intervals, and document inspections for quick audits and safer work.
Here’s what you’ll get from this complete, practical guide built for facility managers, EHS, and maintenance leads:
- Plain-English definitions and how adhesive pipe labels work
- Why pipe identification reduces risk, downtime, and training time
- Standards context: ASME A13.1 conventions and ANSI Z535 principles
- Selection help: materials, sizes, temperature/UV exposure, on-a-roll vs. wrap-around
- Placement rules that crews actually follow on the floor
- Checklists, sample workflows, and documentation tips
Table of contents
- What are self-adhesive pipe markers?
- Why pipe identification matters
- How self-adhesive pipe markers work
- Types and selection methods
- Best practices for compliance (ASME A13.1 + ANSI Z535)
- Tools, resources, and templates
- Case studies and practical examples
- FAQ
- Conclusion + Key takeaways
Local considerations for your area
- Plan for seasonal humidity and temperature swings across the USA by choosing materials with proven adhesion across cold starts and summer heat cycles.
- Schedule audits before peak production periods or utility maintenance windows to fix faded or missing markers without disrupting operations.
- If your site spans indoor and outdoor runs, standardize a UV-rated set for exterior lines so replacements are grab‑and‑go for field crews.
What Are Self-Adhesive Pipe Markers?
Self-adhesive pipe markers are preprinted, pressure‑sensitive labels that wrap around pipes to show contents and flow direction. They install without fasteners, bond to clean surfaces, and follow color/legend conventions from ASME A13.1 and ANSI Z535 to make hazards and utilities obvious at a glance.
In practice, these markers function like a facility’s visual language. They compress critical information—medium, qualifiers (hot/cold, potable/non‑potable), and direction—into color bands and arrows crews read in seconds. For large U.S. sites, that speed translates into fewer errors during lockout/tagout, quicker line tracing, and tighter emergency response.
- Core purpose: Identify what’s flowing, where it’s going, and any special conditions worth immediate attention.
- Where they fit: Industrial plants, warehouses, utilities, construction, and commercial facilities—everywhere VisionMarker’s customers operate.
- Why adhesive: Fast installs, consistent wrap, no hardware required, and dependable adhesion on clean metal or painted surfaces.
VisionMarker engineers its pipe identification products for durability—resistance to UV, moisture, and common chemicals—so labels remain readable after washdowns, outdoor exposure, and daily wear.
Why Pipe Identification Matters
Clear pipe identification cuts risk, supports standards alignment, and saves time. Labeling reduces trace time during maintenance, improves emergency response, and helps new hires orient faster. Consistent markers across lines also simplify audits and equipment changeovers in busy U.S. facilities.
Here’s the thing: when teams can identify a line in under five seconds, they make better decisions. Visual consistency lowers mis‑valving risk and keeps crews aligned during shift handoffs. Many industrial labels are designed for multiyear outdoor service life, so clarity isn’t short‑lived.
- Safety and compliance: Aligns with ASME A13.1 identification practices and ANSI Z535 color/signal logic used throughout safety signage.
- Operational efficiency: Faster line tracing means shorter shutdowns, fewer callbacks, and smoother PM routes.
- Training impact: Visual cues accelerate onboarding; new techs learn routes and utilities faster with uniform legends and arrows.
- Audit readiness: Clean, standardized labeling demonstrates control and makes internal/external reviews straightforward.
For VisionMarker customers working under strict procedures (utilities, food & beverage, and manufacturing), pipe markers reinforce broader labeling systems—PPE reminders, lockout points, and emergency equipment—creating a cohesive safety ecosystem.
How Self-Adhesive Pipe Markers Work
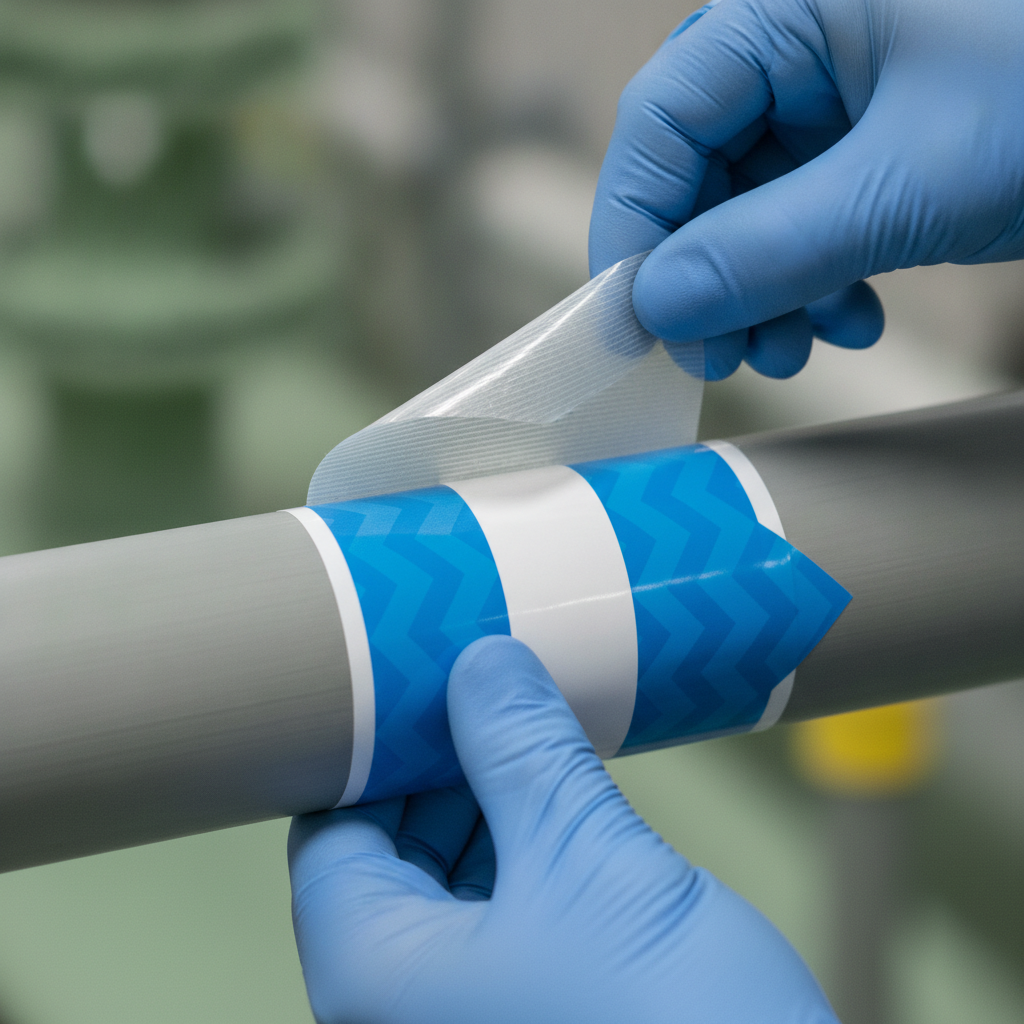
Self-adhesive markers use an industrial pressure‑sensitive adhesive on a durable face film. Prep the surface, align to flow, wrap firmly, and squeegee out air. Proper cleaning and consistent pressure create a long‑lasting bond that resists UV, moisture, and typical plant chemicals.
Most high‑performance markers combine a printable vinyl or polyester face with acrylic adhesive. That pairing balances flexibility (for curved pipes) with ruggedness (for wipes and weather). When applied to a clean, dry, room‑temperature surface, the bond reaches handling strength within minutes and continues to build over 24 hours.
- Survey and plan: Walk the route, map contents and flow, and note high‑visibility placements (entry/exit points, valves, tees, and direction changes).
- Prep surfaces: Wipe dust, oil, and moisture. Lightly abrade glossy paint if needed. Dry before application.
- Align to flow: Point arrows with the actual direction; place where they’re readable from typical approach angles.
- Peel and tack: Start a straight edge; avoid stretching. Tack one side and work around the circumference.
- Apply pressure: Use a squeegee or gloved hand to set adhesive and push out air.
- Check visibility: Confirm no obstructions from conduit, guards, or insulation overlaps.
- Record it: Update your piping identification log—location, contents, and inspection date.
- Revisit: Inspect after the first heat/cold cycle to ensure full adhesion and edge seal.
In our experience, documenting placements and photos while you install pays dividends during audits. It also speeds future work when utilities shift or equipment is replaced.
Types and Selection Methods
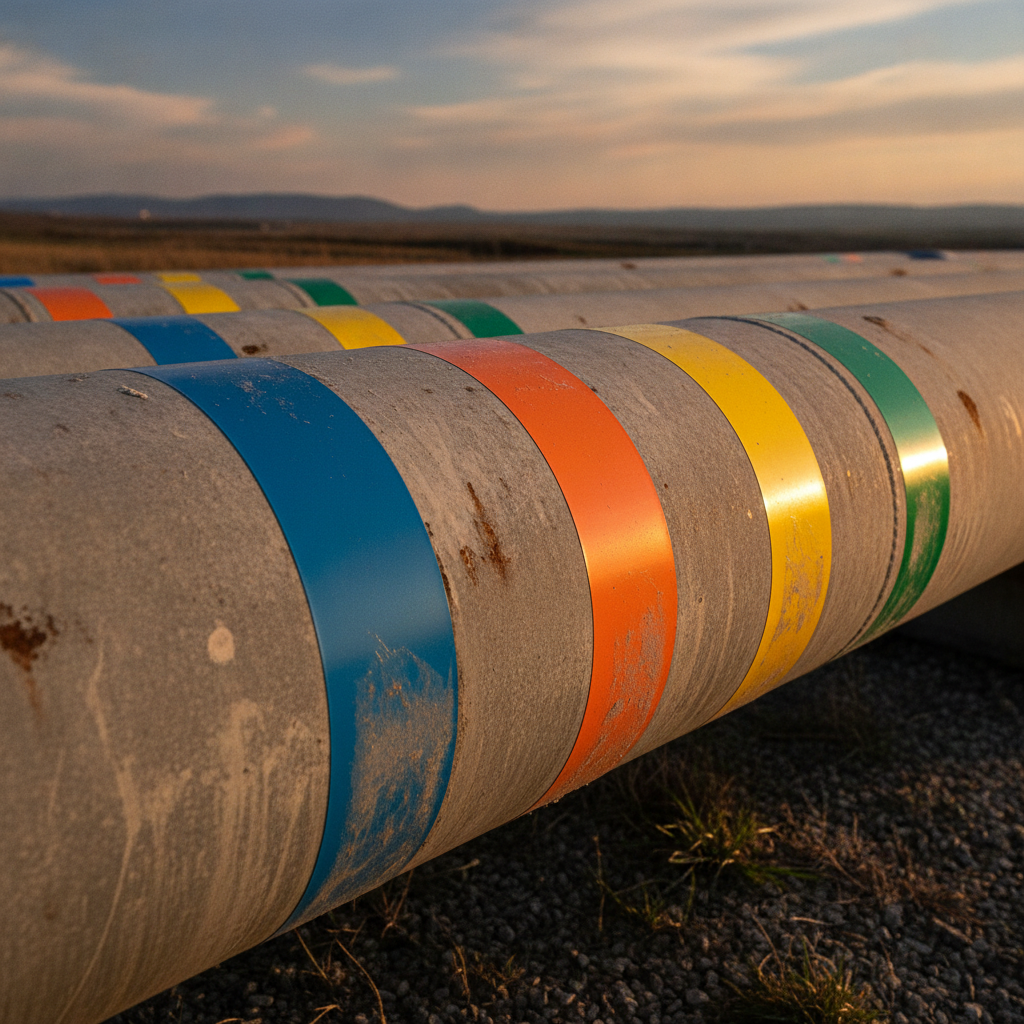
Choose self‑adhesive pipe markers by environment, pipe diameter, and readability distance. Wrap‑around markers fit most uses; on‑a‑roll and continuous options speed volume work. For outdoor or washdown zones, pick UV‑ and chemical‑resistant films with aggressive adhesives and high‑contrast colors.
VisionMarker’s catalog supports common media across U.S. facilities. Explore the pipe markers catalog to standardize your program and reduce one‑off sourcing.
Common types
- Wrap‑around, pre‑sized: Fast installs for known diameters; consistent legend and arrow alignment.
- On‑a‑roll / continuous: Efficient for long runs; cut to length and apply repetitive legends and arrows.
- Environmental variants: High‑temp, low‑temp, UV‑rated, and chemical‑resistant constructions for specific areas.
- Directional arrows/bands: Supplemental arrows to reinforce flow at junctions and congested racks.
Process table: selecting the right marker
| Factor | What to Check | Best Choice | Notes |
|---|---|---|---|
| Pipe diameter | Outside diameter and viewing distance | Pre‑sized wrap‑around | Larger diameters need bigger legends and bands |
| Environment | UV, washdowns, chemicals | UV/chemical‑resistant films | Use exterior‑rated sets outdoors |
| Volume | Number of markers per run | On‑a‑roll continuous media | Speeds repetitive installs |
| Auditability | Need for uniform legends | Standardized SKUs by medium | Reduces variation during replacements |
| Lighting | Low light or glare | High‑contrast colors/finishes | Matte films cut glare; reflective optional |
Concrete examples from VisionMarker’s lineup:
- Water utilities can standardize on water pipe markers across treatment, storage, and distribution areas.
- Compressed air routes stay consistent with air pipe markers on main headers and drops.
- Differentiate building systems with domestic water vs. non‑potable water markers.
- For production lines, standardize process water markers to separate utility and process media.
- Identify risks plainly with natural hazardous markers where applicable.
Best Practices for Compliance (ASME A13.1 + ANSI Z535)
Align your program with ASME A13.1 identification and ANSI Z535 color/signal conventions. Apply markers where they’re easy to see: at entry/exit points, valves, and direction changes, then at regular intervals on straight runs. Use clear arrows, readable legends, and consistent colors site‑wide.
Standards exist to make decisions faster under pressure. While facility specifics vary, these field‑tested practices keep programs consistent across the USA:
Color, legends, and arrows
- Follow established color families so crews recognize utilities and hazards without guesswork.
- Use simple, consistent legends and clear arrows aligned with actual flow.
- Avoid mixing finishes (gloss/matte) in the same area if glare is a problem; pick one standard look.
Placement that passes audits
- Place markers at points of entry and exit, near valves and tees, and before/after penetrations.
- Repeat at practical intervals on straight runs; congested racks benefit from shorter spacing.
- Mount where typical approach angles have a clear view; avoid obstructions from nearby conduit or guards.
Size and readability
- Size legends so they’re readable from common approach distances for the area.
- Increase band width and letter height as pipe diameter grows; oversize rather than undersize in busy zones.
- Use high‑contrast colors and matte films where glare interferes with reading.
Documentation and review
- Maintain a living pipe list with media, route, and last inspection date.
- Photograph key placements (valves, entry/exit) for consistency checks during turnover.
- Schedule periodic reviews—seasonally for outdoor lines and during PM windows indoors.
Remember, consistency beats perfection. A uniform, readable system that crews trust outperforms a bespoke design that changes from room to room.
Tools, Resources, and Templates
Build a simple, repeatable toolkit: a pipe list template, an installation checklist, a photo log, and standard SKUs. Stock indoor and outdoor sets separately, keep extra arrows on hand, and document every change in a shared register.
Starter kit for your team
- Pipe list template: Route, contents, qualifiers, diameter, and inspection date.
- Install checklist: Surface cleaned and dry, alignment checked, pressure applied, photo captured, record updated.
- Standard SKUs: Lock a set of self‑adhesive pipe markers for each common medium.
- Spare arrows and bands: For junctions, new drops, and clarifying flow at tees.
- Photo log: Quick reference for replacement and training.
Pair markers with related safety identification to strengthen your program. For example, standardize emergency visuals alongside utilities using VisionMarker’s fire safety products and site signage.
If you’re benchmarking tape properties while planning installs, this adhesive tapes overview offers a useful snapshot of product types and use cases. During utility checks, plumbing pros often trace usage and leaks; this hands‑on leak detection walkthrough demonstrates a practical tracing approach for water lines. For broader materials context in construction specification work, you may find this materials designation explainer helpful.
Our team helps EHS and maintenance leaders map routes, select standardized SKUs, and create inspection logs. Share your media list and environment details, and we’ll recommend a complete self‑adhesive set you can roll out quickly.
Case Studies and Practical Examples
Standardized self‑adhesive pipe markers shorten line tracing, reduce rework, and improve audits. Real‑world rollouts show faster PMs, clearer shift handoffs, and easier training when one consistent visual language replaces ad‑hoc tags and fading paint bands.
Example 1: Water treatment upgrade
A municipal team refreshed potable, non‑potable, and process lines during a controls upgrade. By standardizing legends and arrows from VisionMarker’s lineup, crews cut tracing time during commissioning and reduced confusion between plant and building systems.
- Utility routes received water markers at entry/exit points and valves.
- Facility piping transitioned to domestic water and non‑potable identifiers for clarity.
- Outdoor sections used UV‑rated sets with high‑contrast bands to stay readable in bright light.
Example 2: Manufacturing compressed air
Production experienced pressure drops and mis‑valving at shift change. A simple adhesive marker rollout added arrows and consistent legends on main headers and drops, making flow and isolation points obvious.
- Main lines and drops got air markers at regular intervals.
- Junctions gained extra arrows to show flow unambiguously.
- Documentation tied markers to a shared equipment map for quick reference.
Example 3: Process water segregation
In a food and beverage facility, a process water loop occasionally got confused with utility water during maintenance. Dedicated legends and arrows, placed near valves and filters, eliminated the mismatch.
- Teams standardized on process water markers and reinforced placement near change points.
- Photo logging built a visual baseline for monthly checks.
- Crews reported faster onboarding for new technicians due to visual consistency.
Frequently Asked Questions
Facility teams ask about placement, prep, and durability. Put markers at entry/exit points, before/after valves, and at intervals on straight runs. Clean and dry surfaces first. Choose UV/chemical‑resistant films where needed. Review markers during routine PMs and after major changes.
Where should self-adhesive pipe markers be placed?
Place them where they’re easiest to see: at pipe entry/exit points, before and after valves and tees, and at direction changes. On long straight runs, repeat at regular intervals so technicians can confirm contents and flow from multiple locations without tracing the entire line.
How do we prepare the surface for strong adhesion?
Wipe dust, oil, and moisture. If paint is glossy, lightly abrade and clean again. Apply the marker to a dry, room‑temperature surface. Align to flow, wrap smoothly, and use firm pressure to activate the adhesive and remove air for a lasting bond.
What’s the difference between wrap-around markers and on-a-roll options?
Pre‑sized wrap‑around markers are fast and consistent for known diameters. On‑a‑roll or continuous media speeds high‑volume work and lets you cut to length. Both rely on clean surfaces and firm pressure; choose based on volume and how standardized your pipe diameters are.
How often should we audit or replace markers?
Review markers during routine PMs and any time a system changes. Outdoor or washdown areas benefit from seasonal checks. Replace any marker that’s faded, peeling, obstructed, or incorrect. Keep standard SKUs on hand so swaps take minutes, not days.
Conclusion
A reliable pipe identification program is simple: pick ANSI/ASME‑aligned self‑adhesive markers, apply them where people look, and keep a living record. Do that consistently and you’ll boost safety, speed maintenance, and make audits routine instead of stressful.
Self-adhesive pipe markers let U.S. facilities align visuals across utilities and hazards without complex installs. Standardize colors, legends, and arrows. Document everything. And stock indoor/outdoor sets so replacements are always ready. When crews can read a line in seconds, they work safer and faster—every shift.
Key takeaways
- Use ANSI/ASME conventions for colors, legends, and arrows across your site.
- Place markers at entry/exit, valves, tees, and direction changes, with regular repeats on long runs.
- Prep surfaces and apply firm pressure for durable adhesion that resists UV, moisture, and chemicals.
- Keep a shared pipe list and photo log; schedule reviews during PM windows and seasonal shifts.
- Standardize SKUs for common media so replacements are quick and consistent.