
 Canada


A concealed fire sprinkler head is a ceiling-mounted sprinkler with a decorative cover plate that hides the sprinkler until heat activates it. The cover releases at a set temperature, and the sprinkler deploys water to control or suppress fire. In the USA, these heads pair with clear fire protection signage to support safe response and code compliance.
By VisionMarker · Last updated: 2026-07-07

Quick Summary and Table of Contents
Concealed sprinklers deliver fire protection with a low-profile look. This guide explains what they are, how they work, where to use them, and how industrial signage—NFPA 170 symbols, ASME A13.1 pipe markers, and warning signs—supports safety programs. Use the table of contents below to jump to what you need.
Facility managers and EHS leaders often balance life safety, code alignment, and interior design. Concealed fire sprinkler heads help satisfy all three. Below is your roadmap to selection, placement, signage, inspections, and real-world coordination with industrial labeling.
- What a concealed head is and where it fits
- Why aesthetics and safety both matter for stakeholders
- How heat-sensitive elements, cover plates, and deflectors operate
- Types: concealed pendent and sidewall heads; cover plate options
- Best practices for clearance, inspection, and documentation
- Signage and labeling that support response and maintenance
- Examples in offices, warehouses, healthcare, and hospitality
- Actionable checklists, a comparison table, and FAQs
What Is a Concealed Fire Sprinkler Head?
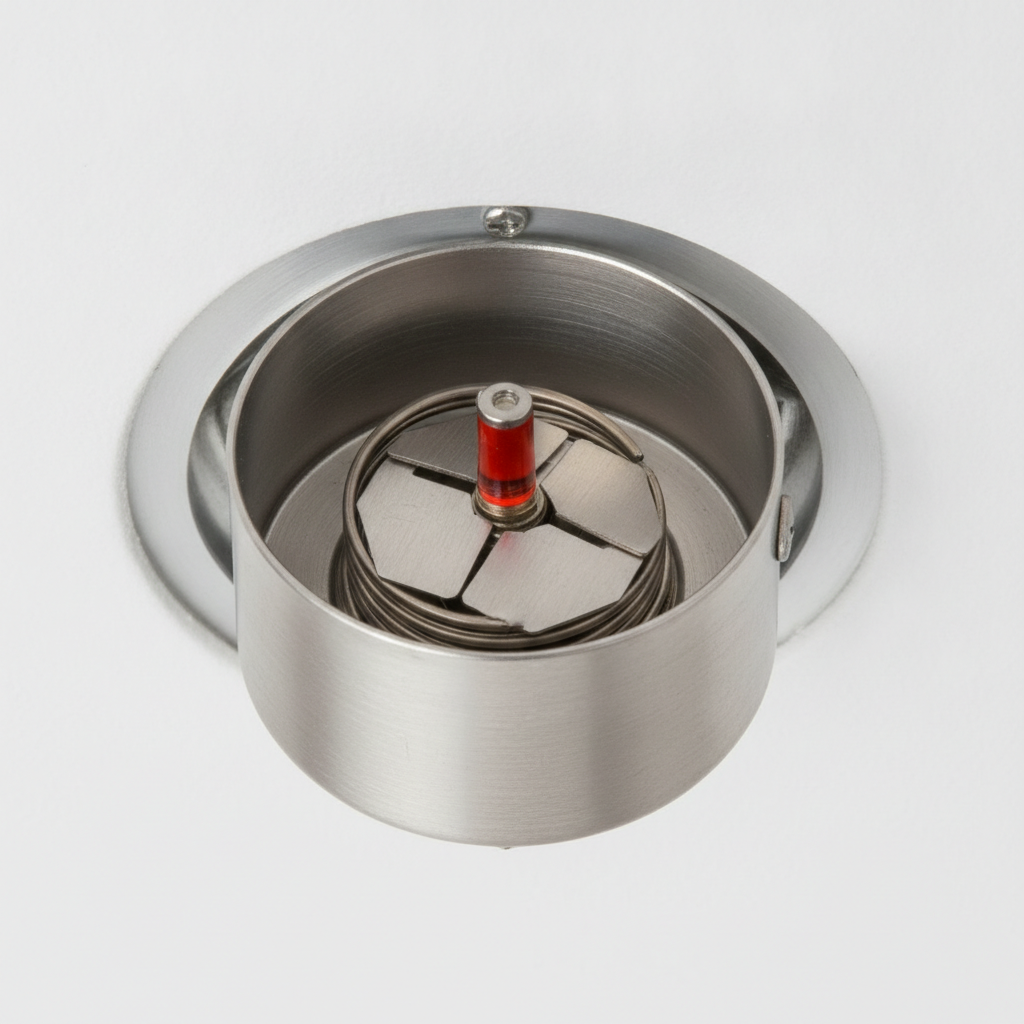
A concealed fire sprinkler head is a recessed sprinkler hidden behind a low-profile cover plate. When ambient heat reaches the cover’s release temperature, the plate falls, the deflector drops into position, and water discharges to control or suppress fire while preserving a clean ceiling appearance.
In plain terms, a concealed model is a standard automatic sprinkler engineered for visual discretion. You’ll see a flush round (or occasionally square) cover that color-matches the ceiling. Behind it sits a cup with the thermal element and a folded deflector that swings down at activation.
- Purpose: Deliver code-compliant protection without interrupting the architectural look.
- Cover plates: Held by a heat-responsive attachment; designed to detach before water flows.
- Temperature ratings: Ordinary ratings commonly fall around 135–170°F; elevated ratings exist for hotter environments.
- Discharge: Once the deflector drops, the pattern is designed to distribute water effectively over the hazard area.
From an operations standpoint, concealed heads integrate into the same hydraulic and supervisory regime as other sprinklers. Where these heads are installed, supporting wayfinding—like fire signage that speeds response—helps teams act fast when seconds count.
Why Concealed Heads Matter to Safety, Compliance, and Design
Concealed heads matter because they combine life safety performance with a discreet, code-aligned look. They support occupant confidence, design continuity, and operational efficiency—especially when paired with standardized fire protection signs and pipe markers that guide responders and maintenance teams.
Decision-makers weigh occupant safety, inspection ease, and tenant expectations. Concealed sprinklers protect people and property while keeping ceilings visually clean—useful for offices, hospitality, and healthcare where design and hygiene are closely scrutinized. In our experience supporting signage programs across the USA, clear, consistent visual communication multiplies the value of suppression systems.
- Risk reduction: Automatic sprinklers are proven to control early-stage fires, improving survivability and limiting damage.
- Confidence and compliance: Harmonized fire protection signage and labeling practices reduce confusion during drills and incidents.
- Aesthetic continuity: Concealed plates blend with ceiling finishes, supporting brand standards in public areas.
- Maintainability: When supported by clear door and room identification, technicians find valves and risers faster.
Here’s the thing: even excellent hardware underperforms without a wayfinding layer. That’s why we emphasize pairing suppression systems with standardized symbols and directional cues that staff will instantly recognize under pressure.
How a Concealed Sprinkler Head Works
A concealed head uses a heat-responsive cover that detaches first, allowing the internal sprinkler to deploy. The thermal element then actuates, the deflector drops into position, and water discharges in a designed pattern to control or suppress the fire footprint below.
Understanding each stage helps facilities plan inspections and avoid damage from accidental contact or paint. It also clarifies why signage that marks critical rooms, shutoffs, and hazards makes response more reliable for both in-house teams and fire service personnel.
- Cover release: The decorative cover plate typically releases at a slightly lower temperature than the sprinkler’s thermal element so the mechanism can deploy unimpaired.
- Thermal actuation: A glass bulb or fusible link opens at its rating, allowing flow. Ordinary ratings are often around 155°F; others address higher ambient conditions.
- Deflector engagement: The deflector swings down to shape the spray. Geometry and K-factor influence discharge characteristics.
- Hydraulic demand: The system must meet pressure and flow requirements; designers size piping accordingly.
- Supervision: Valves, alarms, and supervisory devices provide status and fault awareness.
Takeaway: the cover’s job is purely aesthetic until seconds matter—then it must disappear so the sprinkler can do its work. Keep covers unobstructed, unpainted, and intact. When heads sit above signage boards or casework, maintain vertical and horizontal clearances to preserve spray patterns.
Types, Ratings, and Where Each Works Best
Concealed sprinklers come primarily as pendent and sidewall models, with multiple temperature ratings, finishes, and cover plate options. Choose based on hazard type, ceiling geometry, and environmental conditions while maintaining code-required spacing, clearance, and obstruction rules.
Selection is contextual. The concealed family is broad enough to fit tight soffits, corridors, and premium interiors, but you still need to balance thermal sensitivity, throw, cleaning access, and potential obstructions like beams or lighting canisters.
Common concealed variants
- Concealed pendent: Recessed in horizontal ceilings; the most common aesthetic choice for offices, lobbies, and conference suites.
- Concealed sidewall: Used in corridors, small rooms, or when horizontal piping makes sidewall placement efficient.
- Temperature classes: Ordinary (approx. 135–170°F), intermediate, high, and very high ratings available for specific ambient conditions.
- Finishes and covers: White, off-white, or color-matched plates; some have micro-gaps designed for thermal movement.
Where concealed heads excel
- Public-facing areas: Entrances, lounges, and sales floors where ceiling continuity matters.
- Healthcare and labs: Cleanable covers reduce crevices; pair with clear equipment identification to support inspections.
- Hospitality: Guest corridors and ballrooms; signage helps staff coordinate evacuations.
- Warehouses: Strategic use in offices and showrooms adjacent to high-bay storage protected by other head types.
Concealed vs. recessed vs. standard pendent (at a glance)
| Attribute | Concealed | Recessed | Standard Pendent |
|---|---|---|---|
| Appearance | Fully hidden by cover plate | Trim ring visible, deflector exposed | Exposed frame and deflector |
| Ceiling continuity | Excellent | Good | Fair |
| Cleaning/maintenance access | Cover removal needed | Direct access | Direct access |
| Damage susceptibility | Lower (shielded) | Moderate | Higher (exposed) |
| Typical use | Architectural spaces | General interiors | Industrial/utility |
If you’re unsure which head style fits a mixed-use facility, start from hazards and ceiling details, then confirm spacing. A documented signage plan—room IDs, valve placards, and warning sign conventions—keeps your layout coherent as areas evolve.
Best Practices for Selection, Installation, and Care
Select concealed heads that match ambient temperature, hazard class, and ceiling layout. During installation, avoid obstructions and preserve clearances. In service, prohibit painting, prevent physical damage, and document inspections with signage and labels that guide teams year-round.
Selection checklist
- Confirm hazard classification and density requirements from your fire protection engineer.
- Match temperature rating to expected ambient conditions (ordinary vs. intermediate/high).
- Choose K-factor and response type to meet hydraulic calculations.
- Verify ceiling construction (tile, gypsum, cloud panels) and potential heat traps.
- Plan signage and labeling for control valves, risers, and testing points.
Installation and clearance
- Maintain minimum spacing between heads and from walls per design criteria.
- Keep obstruction-free zones below deflectors; avoid lights, beams, and tall fixtures in the spray path.
- Use color-matched covers without aftermarket paint; never paint sprinkler components.
- Protect heads during construction with temporary guards—remove before final acceptance.
- Coordinate with pipe markers and fire protection signs to make future service intuitive.
Care and inspection
- Inspect for damaged or missing covers, corrosion, or evidence of paint and report immediately.
- Verify nothing is hung from plates or frames; even lightweight items can impair operation.
- Ensure access to riser rooms is clearly identified with durable placards and directional arrows.
- Document findings and corrective actions; keep logs accessible to auditors and insurers.
We’ve found that pairing routine checks with a posted legend of fire symbols makes monthly walkthroughs faster and more consistent, especially for rotating staff. Durable signage helps standardize what “good” looks like.
Signage and Labeling That Make Sprinklers Smarter
Sprinklers work best when responders can find controls and read hazards instantly. Use NFPA 170-aligned symbols, ASME A13.1 pipe markers, and consistent warning signs to identify sprinkler rooms, valves, test points, and special hazards throughout the facility.
VisionMarker’s focus is standards-driven communication. While sprinkler hardware protects, signage tells people where to go and what to do. That clarity closes the gap between design intent and real-world action.
- NFPA 170 symbols: Standardized pictograms for fire equipment and egress support quick recognition; see our overview of fire signage conventions.
- ASME A13.1 pipe markers: Label sprinkler mains, drains, and test connections so technicians open the right valve the first time.
- Room and door IDs: Mark “Sprinkler Room – For Fire Control” on access points using industrial-grade materials that resist UV, moisture, and chemicals.
- Warning signs: Apply consistent signal words and colors to flag restricted spaces and hazards; align with your enterprise-wide warning sign program.
- Maintenance labels: Use durable, legible stickers for inspection dates, test intervals, and contact protocols.
For kitchen and food-service environments, pair suppression systems with rigorous hood maintenance and practical staff training. For context on hood suppression practices in a commercial setting, review this exhaust hood suppression overview and related fire code considerations for kitchens. These examples underscore why clear signage and procedures are essential in high-heat zones.
Tools, Resources, and a Ready-to-Use Checklist
Build a repeatable program: document symbols, label piping, mark rooms, and standardize inspections. A concise checklist keeps teams aligned across shifts and sites, cutting response time and audit friction while strengthening the effectiveness of concealed sprinklers.
Core tools to standardize
- Symbol legend: Post NFPA 170 pictograms used on-site near control rooms.
- Pipe marker kit: Stock ASME A13.1 markers for wet, dry, test, drain, and ancillary lines.
- Door placards: Use durable plates for “Sprinkler Room,” “Fire Pump,” and “Valve Control.”
- Inspection labels: Weatherproof labels for dates, initials, and next due.
- Wayfinding arrows: Directional signs to quickly locate remote rooms.
Inspection and readiness checklist
- Covers intact, unpainted, and unobstructed across all concealed heads.
- Clearances preserved around lighting, beams, and tall equipment.
- Room IDs and directional signage legible from approach distances.
- Pipe markers present and readable along runs and at valves.
- Logs updated; anomalies and corrective actions recorded.
For team training, short walk-throughs using posted legends and labeled valves often create faster familiarity than long binders. Reinforce the routine—what gets labeled gets found, and what gets found gets fixed.
Mini Case Studies: Concealed Heads + Signage in Action
Concealed heads shine when facilities pair them with standardized signage and labels. The following snapshots show how a clear visual layer makes inspections faster, responses sharper, and stakeholder confidence higher—without compromising architectural finishes.
Modern office campus (USA)
Goal: keep premium interiors clean while ensuring quick response. We supported an EHS team with fire safety products and a unified sign legend. Result: concealed pendent heads in lobbies and meeting suites, plus “Sprinkler Room” door placards and valve markers. New-hire walkthrough times dropped because navigation became obvious.
Healthcare corridor network
Challenge: sidewall concealed heads along long corridors with many intersecting service rooms. We provided a room-ID and arrow system tied to a posted symbol legend. Staff could trace routes to valves and test points quicker, improving preparedness during drills.
Warehouse + showroom
Hybrid layout: high-bay storage protected by industrial heads, front-of-house areas with concealed pendent units. We implemented standards-aligned signage—including pipe markers on mains and drains—so visiting inspectors and contractors immediately understood the system layout.
Hotel guest floors
Priority: aesthetic ceilings with dependable protection. The facilities team adopted a maintenance labeling scheme for monthly checks, room IDs for mechanical closets, and directional arrows to fire pump rooms. Guest areas stayed visually consistent while back-of-house workflows improved.

Common Mistakes and Straight Answers
Don’t paint or tape cover plates, don’t hang items from heads, and don’t block spray patterns. Keep signage current so responders can find controls immediately. If a cover is damaged or loose, treat it as an impairment and resolve it quickly.
- Painting or finishing: Any added coating can fuse covers or hinder heat transfer—replace compromised parts.
- Obstructions: Tall racks, light fixtures, or decorative elements can shadow spray; move them or re-evaluate spacing.
- Missing labels: Unmarked valves or unlabeled drains slow inspections; update markers before audits.
- Cover mismatch: Use manufacturer-compatible replacement covers only.
- Room access: Poorly marked doors waste precious minutes; use durable, high-contrast placards.
For kitchen-heavy occupancies, align ceiling protection with hood suppression maintenance cycles. For a practical perspective on day-to-day kitchen safety routines, see these kitchen fire safety inspection tips. The principle is universal: consistent routines plus clear signs prevent small issues from compounding.
Frequently Asked Questions
These concise answers address the questions facilities and safety teams ask most about concealed sprinklers—operation, maintenance, placement, and signage integration. Use them to brief stakeholders and set consistent expectations across shifts.
What makes a sprinkler “concealed”?
It’s recessed behind a cover plate that hides the sprinkler until activation. Heat releases the cover first; then the internal sprinkler actuates, the deflector drops, and water discharges. The goal is full protection with a clean ceiling look.
Can I paint a concealed sprinkler cover to match the ceiling?
No. Do not paint sprinkler components. Use manufacturer-supplied finishes or cover plates designed to match. Paint can bond covers or alter heat transfer, delaying activation and risking system failure.
Where are concealed heads most appropriate?
They’re common in public-facing interiors—offices, hospitality, and healthcare—where ceiling aesthetics matter. Use them where spacing, ambient temperature, and obstructions allow, and pair with clear room IDs and pipe markers to support maintenance.
How do signage and labels help during an emergency?
Signs identify sprinkler rooms, valves, and equipment instantly. Standardized symbols and pipe markers guide responders to the right controls without guesswork, saving time when conditions are noisy, smoky, or unfamiliar.
What if a cover plate looks loose or damaged?
Treat it as an impairment. Isolate the area if needed and notify qualified personnel. Replace with a compatible part and verify no paint or debris interferes. Update maintenance logs and re-check clearances.
Key Takeaways
Concealed sprinklers provide discreet, code-aligned protection. Keep covers intact, maintain clearances, and reinforce systems with standardized signage, pipe markers, and posted symbol legends so teams respond faster and audits run smoother.
- Concealed heads hide behind covers until heat triggers deployment.
- Selection depends on hazard, temperature, and ceiling details.
- Never paint or obstruct; protect heads during construction.
- Use NFPA 170 symbols, ASME A13.1 markers, and durable room IDs.
- Standardized signage shortens response time during real incidents.
Conclusion and Next Steps
Treat concealed sprinklers as part of a system: detection, suppression, signage, and routine verification. When hardware and communication work together, people find controls faster, incidents stay smaller, and stakeholders stay confident.
Ready to strengthen your program? Align your concealed head layouts with a signage backbone that speeds action:
- Document your fire symbols and post a site-specific legend.
- Label mains, drains, and test lines with durable pipe markers.
- Mark sprinkler rooms and valve access with high-contrast placards.
- Standardize inspection labels and log updates by area.
